Tuesday, December 20, 2011

Tis the season.

Jingle bells, jingle bells - ho, ho, ho!


Yeap, it's that time of the year when kids at the signal have started selling Santa hats, when the Emporium Mall has put an inflated Santa at their entrance, when Agha's and such have started selling christmas tree decor. There is no snow, no sleigh, no SALE and possibly no gifts, but just a reason to celebrate.


And in this spirit why get left behind.


Here are few fun decorations you can make, of course you can buy the ones in the stores but where is the fun in that, pssh.


Christmas ornament you can make with colored papers or magazine pages. 


ONE:
 The instructions:


1. Cut out 10 paper circles (any size, as long as they're all the same). Text weight paper will be easier to work with than cardstock.
2. Cut each circle along the radius.
3. Put a small piece of double-stick tape on each side of the cut near the edge of the paper.
4. Flip the circle over so the taped side is down; then pull each flap across the circle toward you and twist to form a cone. Press the taped ends down to secure. You should end up with two cones that look vaguely like a fortune cookie. Do this to each of your 10 circles.
5. String the double cones together with a needle and thread. Make sure they're gathered snugly in a ball and tie a knot. Use the trailing ends of the thread to make a loop for hanging.
Here's one made from magazine pages. If you like
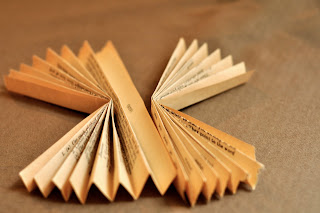
 recycled crafts, give it a whirl.


TWO:


You'll need: 
Paper, scissors, a circular object for a template, a ruler, pencil, needle, thread, rubber band, and glue.


Instructions:


1. Cut out ten paper circles, using a jar lid or CD for a template. (My circles are 5" in diameter. I stacked sheets of computer paper and cut out several circles at once.)


2. In each circle, cut eight evenly spaced slits toward the middle, stopping about a half inch from the center point.


3. With a pointed pen or sharp pencil, curl each tab into a cone and secure with a dot of glue. If you can pull off a tightly rolled perfect point, congratulations. I was running a little low on patience and settled for "sort of pointy," which I think also looks nice.


4. Cut two small pieces from a wide rubber band. These will hold the ornament together at each end.


5. Thread a needle and knot the ends of the thread together. String on one of the rubber band pieces.


6. Push the needle through the centers of five stars with their flat sides face down. Turn over the remaining five stars so their flat sides are facing up and thread them on, followed by the second rubber band piece.5. Thread a needle and knot the ends of the thread together. String on one of the rubber band pieces.

7. With a chopstick or pencil, push down on the rubber band to compress the stars into a ball while pulling upward on the string with your other hand. The rubber should hold the stack together without requiring a knot. Adjust the paper cones as needed to make a pleasing shape.


8. Tie a loop in the thread for hanging if desired.
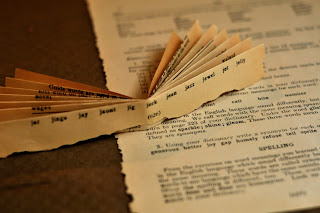
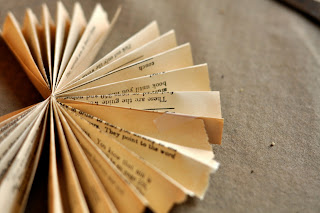


THREE:


Instructions:


1. Cut the paper into strips that are 3.5" long and 0.5" wide. (This makes a small ornament about 3" in diameter.) Cut 9 strips of each color. Cut two 0.75" circles. Tracing around a penny works nicely.


2. Fold the paper strips in half. A crisp fold isn't needed; just a light crease will do.


3. String a bead onto a length of thread. Then push both ends of thread through the needle so the thread is doubled.


4. Poke the needle through one of the circles to string it next to the bead. Then string on all the paper strips near one end, alternating colors. 


5. After all the paper strips are added, begin threading the opposite ends onto the string. To do this, start with the strip you put on first (the one next to the paper circle). Take its loose end and push the needle through it. Continue threading on the paper strips in order. They'll naturally begin to fan out as you go.


6. Add the second paper circle.


7. Pull the needle off the thread. Feed the bead onto one of the loose ends of thread, then tie both ends of thread in a knot to hold the bead on next to the circle. If your ornament hangs a little crooked, thread the needle again and push both ends of thread up through the underside of the bead and out through the top so both ends of thread emerge. Tie off a loop and hang that spaceship.


Play with the colours, be creative!


Saturday, December 17, 2011

Kink and Pink - Bachelorette Party

The night before last I went to a hen's party, and may I say God bless our trips to other countries (in this case UK) that provide us with adorable and convenient decor. It made me think, what about people who can't get things from abroad in time? Can't fly in the cute martini glass confetti, shot glass necklaces, funkay eyewear et al.

God bless DIY and event planners (ahem).

There is nothing our blessed country can't do x2 better and x10 cheaper [insert victorious laugh].

One thing to remember for a bachelorette party: Kink and Pink go hand in hand.

Having said that there still needs to be a theme that is individually yours. From the plethora of ideas, I'm showing you girls a peek into one.

It's Sex and the City inspired. So think like them. Decorate shoes, use rhinestones, feathers, buckles, belts... go wild!

Sex and the City 2 party ideas

Sex and the City 2 party ideas

Sex and the City 2 party ideas

Sex and the City 2 party ideas

Don't forget to include fun games!

Friday, November 25, 2011

Your Colour Story.

In the age of black and white Dorothy led a very boring life, until she was introduced to colour and then the yellow brick road, the red ruby shoes, the green emerald et al. made magic possible.

Likewise, colour in events, be it official or personal, spins your mood into the Land of Oz. For me it is very important to have definite theme colours for every event; it describes the mood you are trying to evoke in your guests - fun, quirky, elegant, sombre... the palettes are limitless. 

Keeping that in mind I found an ideal site that I thought I would share with you people to help you pick your colour story. Click away!


Thursday, November 24, 2011

Fun Favour Boxes.

Everyone is always looking for unique ideas for favour boxes. Here is one I found that can fit in some delicious candies as a thank you for your guests. Now, I have not experimented with the size yet, but it seems possible to enlarge the template to make the box a little bigger. Although , I would suggest not to go too big, it might lose its cuteness, but feel free t ogive it a shot :)

What you need:

2 x sheets A4 card (you could use complimentary colours to add an extra bit of pizzazz when your guests open the box!)
A pair of sharp scissors
Pencil
Cocktail sticks or toothpicks
Ribbon to coordinate with your wedding colours

Method:
Dowload and print the templates, and cut out the favour box template.  Glue the two pieces of card back-to-back and then cut out the box shape using the template
Once you have the shape, fold all the little strips inwards, place your favours in the middle, and pinch all the strips together at the top before securing with a little bit of tape.  Cover the tape by tieing a pretty piece of ribbon in your theme colours
Cut out the ‘thank-you’ banners, snipping one end in a ‘v’ shape to make a flag.  Roll the other end around a cocktail stick an secure with a bit of tape.  Gently push your flag into the top of your box…


and DONE! It wold be fun if you could fit some Hershey's Kisses in it. 

Pin It

Thursday, November 3, 2011

Make flower fairy lights.

This is mighty tedious and a little time consuming considering origami is involved, but the result is beautiful. If you have a small affair where you can apply this, I'd highly recommend it.

1027fairylights1.jpg


To make flower fairy lights you will need:
               Fairy lights
               Vellum paper in a variety of colours (vellum paper is hard to find, you can try and alternative like stained acetate)
               Scissors

102708fairy02.jpgMethod:
1. Cut 15cm squares of vellum paper in a variety of colours. You will need two or three squares of paper for each fairy light. Fold paper square in half diagonally to form a triangle.
2. Fold the left and right corners up to meet at the centre, forming a diamond shape. Fold in half to form a small triangle. [see image left]
3. Cut curves along the open edges to form a heart-shaped top and create the petal effect. You might like to choose different petal shapes for each colour. Layering them, the variety of shapes will add depth.
4. Cut across the bottom point to create a small opening to slip the light bulb through. Unfold.
5. Layer a few paper petals in different colours on each fairy light. Attach the flowers above the bulb on the plastic wire so the bulb is left exposed.
While vellum paper is a lot less flammable than ordinary paper, but don’t leave the lights on unattended. 


Once done these lights can stay on even after the party or you can hang them in your or your children's room.

Tuesday, October 25, 2011

Inspiring image of the day.

Ideas can come from anywhere, most importantly the internet. I have realized no matter what profession you belong to creativity and inspiration are two elements that are fundamental to task, unless you're a number puncher, in which case grab a dictionary and look up these words. 

A lot of things inspire me. So, I have decided to share some with you, who knows it might get the cogwheels of your mind turning! 


Tuesday, October 4, 2011

Cupcake Flower Holder.

I found this amazingly simple decorative centerpiece online and I thought of it as a must-share piece.


What you need:
Large zig-zag or similar pot
Floral form (if you can't find a ball shape you can cut it to size)
Candle
Seasonal flowers
Ribbon


The Creation:
Take the floral ball/cut-to-size foam and place it in the zig-zag pot. Insert the candle in the foam (wet the foam for a longer lasting piece) carefully and securely wedge it in. Don't put it all the way down. Now start putting in the seasonal flowers and fill it to the brim (Motia will look absolutely gorgeous and smell wonderful - just saying). Then, tie the ribbon around the candle.


And your piece is ready!


Saturday, October 1, 2011

Paper Wheels Backdrop.


Remember how we made fans with paper when we were kids? Took a sheet of paper and started with the accordion fold, held the finished strip in our hand from one end and spread the the other end.

Well, who new that can turn into a nifty backdrop one day!


Here's how I did it:

Take papers of different colours and sizes. The minimum and maximum depend depends completely on you. My smallest size was 5"x4" and the largest wet to 12"x11". I took wrapping sheets and coloured A4 paper that went with my theme.


For one paper wheel you will require two folded fans. So, take your paper and fold it into an accordion style.


Do the same to the other sheet of paper and put he two back to back.


Take a string and tie the two fans tightly together.


 Next, tape or staple the gaping edges, I stapled them. Go all the the way around until you have a wheel.


Once you have enough pieces to fill the size of your backdrop started making a collage of paper wheels and stick them with hot glue.


 Ta daa!


Sunday, September 25, 2011

Paint Swatch Chandelier for any occasion


{Step 1} You’ll need a whole bunch of paint swatches in your desired colours (seriously, emphasis on the whole bunch part). I picked a variety of blush, pink and red hues so I could get a fancy ombre look to my chandelier but I can only imagine how many different looks you could go for with your own chandelier. Using a scalloped paper punch you’ll need to punch about 40 -60 swatches into little medallions. Keep the medallions divided by colours in little saucers or cups like below.


(Don't fret if you don't have the fancy paper cutter. The alternative is cutting circles with a zigzag scissor. Take 2-3 papers together and start cutting!)


{Step 2} I bought my lamp shade (my chandelier base) from Lowes for about 5 bucks. Using an Exacto knife and super sharp metal scissors I carefully cut apart the fabric lamp shade, peeling away the pieces until the metal parts were as exposed as possible. When picking out a lamp shade I tried to pick out one where the bottom diameter is much smaller than the top. This will make your layers of paint swatch medallions hang better and thus look much better when the final product is done.


{Step 3} Lay out your paint medallions, coloured side down, in the desired order. Tape down a long piece of coloured thread along the middle of the backs of each medallion. Then using a piece of tape, cut down the center width wise, tape together the edges where one medallion meets the next. Without this final piece of tape, the medallions with rotate on their piece of thread, thus showing the bar codes, text and colour names usually located on the backs of the paint swatches. If that doesn’t bother you then this step isn’t necessary! Repeat this step until all of your chandelier strands are strung and taped together.


{Step 4} Flip your lamp shade upside down and fasten it somewhere where it can hang freely (I tied mine to the latch that opens and closes our air vent in our ceiling). Start stringing on your strands along the perimeter of the bottom of the chandelier until the entire metal base is covered. Then start stringing strands along the widest ‘top’ of your chandelier so that the lowest part of your strand hits the mid point of the bottom layer. Continue this all the way around until the entire chandelier is covered. Add a ribbon to the metal pieces (where the light bulb would pop in) and voila! You’re ready to hang this beauty!


- source -