Showing posts with label decor. Show all posts

Wednesday, October 17, 2012

Lollipop Balloons


Materials: balloons, cellophane, dowels, paintbrush, scissors, black tape, white paint, string


This is an adorable idea I found online which is absolutely simple in execution as well - lollipop balloons.

What you can use 'em for you ask? Try a Candyland theme or a Willy Wonka theme or a Sweet factory theme to name a few.

Children will love it! 

Thursday, July 19, 2012

Inspired By Lights

I keep meeting clients who want nothing to have to do with lights, for them flowers is what makes an event look fabulous. It's true, flowers can lift the face of any event no matter how big or small (ask our local caterers who copy Preston Bailey unashamedly and by copy I mean photocopy to the tee! I went to one of the very top ones and in a conversation asked him who designs his florals and very proudly was told, "I do", with this oh-so accomplished smile, and I point out how they are exactly like Preston Bailey's and on being caught he takes out PB's book and says, "this is the bible." *facepalm*). 

The so-called bible - own it and you can be the best caterer (notice how I don't say event/creative planner) there is in Karachi.


Continuing on, lights can be used in so many effective and glamourous ways that it will boggle your mind. Most of the time clients can't visualise when I tell them this, so I researched a few example to help you understand the power of lights, lights, light!


 Preston Bailey's genius (I bet it's in the bible)


This is from an Indian movie. 


And this is from an American TV show (I forget which)


Harry Potter inspired. Just for fun!


Sunday, February 26, 2012

Flowers, dried or fresh.

Small gatherings are so much fun to decorate! There is o much that can be done. The possibilities are numerous. For instance the following that I found at Weddingbee


This bride went all the way for her wedding and played with the concpet of dried flowers and the final product is fabulous! See for yourself.


Tuesday, December 20, 2011

Tis the season.

Jingle bells, jingle bells - ho, ho, ho!


Yeap, it's that time of the year when kids at the signal have started selling Santa hats, when the Emporium Mall has put an inflated Santa at their entrance, when Agha's and such have started selling christmas tree decor. There is no snow, no sleigh, no SALE and possibly no gifts, but just a reason to celebrate.


And in this spirit why get left behind.


Here are few fun decorations you can make, of course you can buy the ones in the stores but where is the fun in that, pssh.


Christmas ornament you can make with colored papers or magazine pages. 


ONE:
 The instructions:


1. Cut out 10 paper circles (any size, as long as they're all the same). Text weight paper will be easier to work with than cardstock.
2. Cut each circle along the radius.
3. Put a small piece of double-stick tape on each side of the cut near the edge of the paper.
4. Flip the circle over so the taped side is down; then pull each flap across the circle toward you and twist to form a cone. Press the taped ends down to secure. You should end up with two cones that look vaguely like a fortune cookie. Do this to each of your 10 circles.
5. String the double cones together with a needle and thread. Make sure they're gathered snugly in a ball and tie a knot. Use the trailing ends of the thread to make a loop for hanging.
Here's one made from magazine pages. If you like recycled crafts, give it a whirl.


TWO:


You'll need: 
Paper, scissors, a circular object for a template, a ruler, pencil, needle, thread, rubber band, and glue.


Instructions:


1. Cut out ten paper circles, using a jar lid or CD for a template. (My circles are 5" in diameter. I stacked sheets of computer paper and cut out several circles at once.)


2. In each circle, cut eight evenly spaced slits toward the middle, stopping about a half inch from the center point.


3. With a pointed pen or sharp pencil, curl each tab into a cone and secure with a dot of glue. If you can pull off a tightly rolled perfect point, congratulations. I was running a little low on patience and settled for "sort of pointy," which I think also looks nice.


4. Cut two small pieces from a wide rubber band. These will hold the ornament together at each end.


5. Thread a needle and knot the ends of the thread together. String on one of the rubber band pieces.


6. Push the needle through the centers of five stars with their flat sides face down. Turn over the remaining five stars so their flat sides are facing up and thread them on, followed by the second rubber band piece.5. Thread a needle and knot the ends of the thread together. String on one of the rubber band pieces.

7. With a chopstick or pencil, push down on the rubber band to compress the stars into a ball while pulling upward on the string with your other hand. The rubber should hold the stack together without requiring a knot. Adjust the paper cones as needed to make a pleasing shape.


8. Tie a loop in the thread for hanging if desired.


THREE:


Instructions:


1. Cut the paper into strips that are 3.5" long and 0.5" wide. (This makes a small ornament about 3" in diameter.) Cut 9 strips of each color. Cut two 0.75" circles. Tracing around a penny works nicely.


2. Fold the paper strips in half. A crisp fold isn't needed; just a light crease will do.


3. String a bead onto a length of thread. Then push both ends of thread through the needle so the thread is doubled.


4. Poke the needle through one of the circles to string it next to the bead. Then string on all the paper strips near one end, alternating colors. 


5. After all the paper strips are added, begin threading the opposite ends onto the string. To do this, start with the strip you put on first (the one next to the paper circle). Take its loose end and push the needle through it. Continue threading on the paper strips in order. They'll naturally begin to fan out as you go.


6. Add the second paper circle.


7. Pull the needle off the thread. Feed the bead onto one of the loose ends of thread, then tie both ends of thread in a knot to hold the bead on next to the circle. If your ornament hangs a little crooked, thread the needle again and push both ends of thread up through the underside of the bead and out through the top so both ends of thread emerge. Tie off a loop and hang that spaceship.


Play with the colours, be creative!


Thursday, November 3, 2011

Make flower fairy lights.

This is mighty tedious and a little time consuming considering origami is involved, but the result is beautiful. If you have a small affair where you can apply this, I'd highly recommend it.

1027fairylights1.jpg


To make flower fairy lights you will need:
               Fairy lights
               Vellum paper in a variety of colours (vellum paper is hard to find, you can try and alternative like stained acetate)
               Scissors

102708fairy02.jpgMethod:
1. Cut 15cm squares of vellum paper in a variety of colours. You will need two or three squares of paper for each fairy light. Fold paper square in half diagonally to form a triangle.
2. Fold the left and right corners up to meet at the centre, forming a diamond shape. Fold in half to form a small triangle. [see image left]
3. Cut curves along the open edges to form a heart-shaped top and create the petal effect. You might like to choose different petal shapes for each colour. Layering them, the variety of shapes will add depth.
4. Cut across the bottom point to create a small opening to slip the light bulb through. Unfold.
5. Layer a few paper petals in different colours on each fairy light. Attach the flowers above the bulb on the plastic wire so the bulb is left exposed.
While vellum paper is a lot less flammable than ordinary paper, but don’t leave the lights on unattended. 


Once done these lights can stay on even after the party or you can hang them in your or your children's room.

Tuesday, October 4, 2011

Cupcake Flower Holder.

I found this amazingly simple decorative centerpiece online and I thought of it as a must-share piece.


What you need:
Large zig-zag or similar pot
Floral form (if you can't find a ball shape you can cut it to size)
Candle
Seasonal flowers
Ribbon


The Creation:
Take the floral ball/cut-to-size foam and place it in the zig-zag pot. Insert the candle in the foam (wet the foam for a longer lasting piece) carefully and securely wedge it in. Don't put it all the way down. Now start putting in the seasonal flowers and fill it to the brim (Motia will look absolutely gorgeous and smell wonderful - just saying). Then, tie the ribbon around the candle.


And your piece is ready!


Saturday, October 1, 2011

Paper Wheels Backdrop.


Remember how we made fans with paper when we were kids? Took a sheet of paper and started with the accordion fold, held the finished strip in our hand from one end and spread the the other end.

Well, who new that can turn into a nifty backdrop one day!


Here's how I did it:

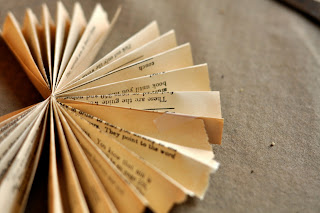
Take papers of different colours and sizes. The minimum and maximum depend depends completely on you. My smallest size was 5"x4" and the largest wet to 12"x11". I took wrapping sheets and coloured A4 paper that went with my theme.


For one paper wheel you will require two folded fans. So, take your paper and fold it into an accordion style.


Do the same to the other sheet of paper and put he two back to back.


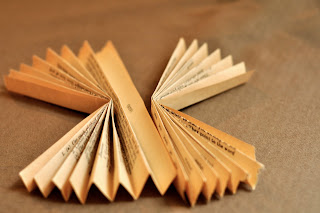
Take a string and tie the two fans tightly together.


 Next, tape or staple the gaping edges, I stapled them. Go all the the way around until you have a wheel.


Once you have enough pieces to fill the size of your backdrop started making a collage of paper wheels and stick them with hot glue.


 Ta daa!


Saturday, June 18, 2011

Colourful party mobiles.


Materials:
Vellum paper, 56 sheets of paper,
a sewing machine, 
fishing weights (not pictured),
an exacto knife and straight edge (or a stack cutter,)
artist tape (for hanging)


 Cut the sheets of vellum into one inch strips. You can do this with an exacto knife or have it cut all at one time with a stack cutter. (If you decide to go the stack color route organizing the paper in the order you want it to hang in will save you some time.)Measure the height of the space where the mobiles will hang to figure out how long you want them. Keep in mind you'll want to keep the eyesight of the guests clear of any obstruction. Once you know the length of the mobiles, layout the different colors in the order you want. Repeat until it is close to the length of mobile you want. Then put it into a stack and it is ready to sew.


Leave a 12" tail of thread at the beginning and start to sew down the middle of the first strip. (I found it is easiest to put a piece of tape on the sewing machine at the end of the strip as a guide to mark where the vellum should be sewn.) Continue feeding each addition strip into the sewing machine.


Hang the mobiles at varying heights over the center of the table with artist tape.

If left by itself the bottom paper will curl up, add a simple fishing weight at the bottom to prevent this from happening and to add a nice polish to the project.

Use your imagination - or any color palette - to go with your event theme.